
written by: Yosef Rex
There are many components that make up the brake system in a vehicle. In this blog, I will focus on three of these components: the master cylinder, the wheel cylinder, and the caliper. The master cylinder is arguably the most important aspect of the brake system because if it completely fails, the driver will have no braking power at all. However, to prevent a total brake failure, it is designed today as a dual master cylinder and dual reservoir, which splits the hydraulic pressure to either the front and rear brakes or diagonally (left front to right rear and right front to left rear).
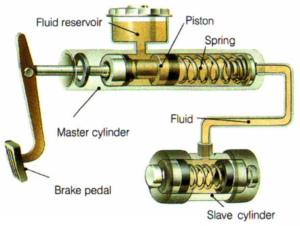
Master cylinder
In some older vehicles, the master cylinder is located directly on the firewall, although in most vehicles today, there is a power brake booster thatis mounted directly on the bulkhead and the master cylinder is mounted on the power booster. To create the force that activates the master cylinder, the driver pushes down on the brake pedal, which is a lever that mechanically pushes a pushrod through the power brake booster, if there is one, into the master cylinder to start the force of the hydraulic component of the brake system.
In the drum brake setup, the purpose of the master cylinder is to force brake fluid through the brake lines to the wheel cylinders to create hydraulic pressure. In the disc brake set up, the master cylinder forces pressure through the brake lines to the piston inside the caliper. When the pushrod is pushed, the force pushes the primary piston forward, blocking the vent port, causing pressure to build up ahead of the primary piston. As hydraulic pressures builds, force is exerted on the secondary piston, causing further pressure build up, and this hydraulic pressure moves though the brake lines tothe wheel cylinders.
There are many symptoms that can indicate that the master cylinder is leaking. Some of the more common symptoms are a spongy brake pedal or a pedal that will sink to the floor when the vehicle is stopped. When a technician determines that the master cylinder is leaking, the master cylinder and the reservoir should be replaced. If you are reusing the reservoir it is very important to replace the O-ring, which is the seal that connects the reservoir to the cylinder body. When replacing the master cylinder, you should drain the brake fluid in the reservoir, detach the brake lines, and remove the bolts that are bolted to the power booster or firewall. Then bench bleed and reinstall the new master cylinder by bolting it to the power booster or firewall and attaching the brake lines. Finally, fill the reservoir with the correct brake fluid and bleed the brake lines directly from the master cylinder until all of the air is out. If spongy brakes still occur then a full brake bleed must be done.
Wheel cylinder functionality
The next component I will cover is the wheel cylinder. The wheel cylinder is basically a “slave cylinder” to the master cylinder. It is where the hydraulic force is converted to mechanical force. The wheel cylinder only operates in the drum brake setup. It is mounted on the top of the backing plate. A bleeder screw is installed in the back of the wheel cylinder behind the backing plate at the highest point to allow proper bleeding without air being trapped in.
Hydraulic pressure from the master cylinder is pushed though the brake lines to the wheel cylinders. The hydraulic pressure forces the pistons inside the wheel cylinder outward towards the brake shoes, causing contact between the brake shoes and brake drum, which creates friction that stops the vehicle.
When a wheel cylinder is leaking, the brake pedal will feel soft or low because the leaking brake fluid will not create enough hydraulic pressure. In order to ensure that the bad brake pedal force is coming from the wheel cylinder, remove the drum to access the shoes and wheel cylinder, then fold back the boot on both sides of the wheel cylinder and check for leaks. If the wheel cylinder is leaking you must loosen the brake line with a line wrench, then remove the bolts that hold it to the backing plate. Gently remove the brake line completely, being sure not to bend the brake line. Then remove the wheel cylinder. Next, place the new wheel cylinder in the backing plate, connect the bolts to the backing plate, and connect the brake line to the wheel cylinder. Then you must bleed the system until all air is out of the brake lines.
What does the Brake caliper do
The last component I will discuss is the caliper. Like the wheel cylinder, the caliper converts the hydraulic pressure from the master cylinder to mechanical pressure that squeezes the brake pads against the rotor in a disc brake setup, creating friction that stops the vehicle. The caliper is mounted over the rotor, and a brake pad is inserted inside the caliper on both sides of the rotor. There are two types of calipers, the fixed caliper and the floating caliper.
The fixed caliper does not move when the brakes are applied. Therefore, in the fixed caliper setup there must be a piston on both sides of the rotor, so that when hydraulic pressure comes though the brake lines, both pistons push out with equal force against the brake pads to create friction on the rotor to stop the vehicle. In comparison, the floating caliper slides on guide pins when the brakes are applied. Therefore, on the floating caliper setup there is only a piston (or multiple pistons) on one side of the rotor and when the hydraulic pressure forces the piston outward, it slides the whole caliper across the guide pins creating equal brake friction on both sides of the rotor, which creates braking power.
When a vehicle is pulling to one side it is possible that the cause is a frozen caliper. The frozen caliper is usually located opposite the side that the vehicle is pulling toward. Today, we don’t usually rebuild caliper pistons; rather we change the whole unit out as a whole. To do so, disconnect the brake hose by removing the banjo bolt, and remove the bolts or sliding pins that are holding it in place, then reinstall the new caliper. To fix a frozen caliper you would have to buy a rebuilding kit and take out the piston with low-pressure compressed air, and then replace the square cut seal and dust boot seal with new ones. Then use a honing tool on the inside surface of the bore. Afterwards, lubricate the new piston with brake fluid before inserting it into the bore. Finally, when repairing a floating caliper, before reinstalling the caliper back on its mount, take out the sliding pins and sand them down if they’re rusty then lubricate and reinstall the slide pins. This is to make sure that the caliper can slide easily across the pins, to ensure equal braking on both sides of the rotor when the brakes are applied. After the repair is done, it is important to bleed the system of any air that entered in during the repair process.
-Rextech